

Learning to play the guitar is an amazing journey, where reading the chords is one of the first steps toward getting started. There isn't possibly a better way to learn guitar chords than reading chord charts.
When you look at the sheets filled with guitar chord diagrams, all the jumbled symbols, and complex markings might make your head spin. Honestly, guitar chord charts seem more like mathematics than music.
However, there's no need to fret (excuse my bad pun). Nothing can stop you from playing your favorite songs once you learn how to read guitar chord charts. So, what exactly is a guitar chord diagram, and how to read guitar chord charts?
What is a Guitar Chord Chart?
A guitar chord chart is a simplified visual representation of the guitar frets that give you the necessary information you need to play the particular chord. Here is an example of a blank guitar diagram:

Have you noticed the fretboard closely? Then this image will remind you of the patterns of strings and frets.
1. How does a guitar diagram look?
Most of the guitar chords look more or like the same. Let's take a quick look at the diagram of the D major chord.

I know it seems confusing with all the black dots, horizontal and vertical lines, numbers, and symbols on the diagram.
Guitar chord diagram formations are the same for different types of guitars. To make it simpler, let's take a look at this blank chord diagram and understand the formation better.

The thick black horizontal line you see at the top of the diagram stands for the nut of the guitar.
For your information, the nut is the thin and elevated platform on the edge of the fretboard that keeps the strings elevated over the frets. Nuts come in different sizes and colors.
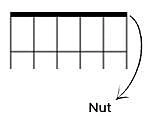
You can see the tiny boxes under the nut, right? These boxes represent frets on the fretboard. The first row is the first fret. Similarly, the second and third one represents the 2nd and 3rd fret, respectively.
2. The Vertical and Horizontal Lines
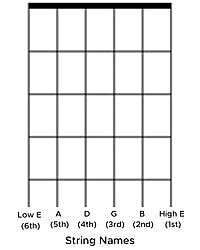
The vertical lines on a guitar chord chart represent the strings of a guitar. There are 6 vertical lines that substitute the 6 strings on a guitar.
The strings are low-E (6th string), A (5th string), D (4th string), G (3rd string), B (2nd string), and high-E (1st string) from left to right, where the low-E string is the thickest and high-E string is the thinnest string.
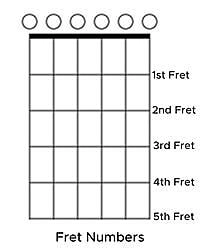
The horizontal lines parallel to the nut of the guitar are the representation of frets. The gap between the nut and the first metal bar is the first fret. Similarly, the space between the first and second metal bars is called the second fret. Usually, a guitar chord consists of the first five frets on the chord diagram.
3. The Numbering of the Fingers
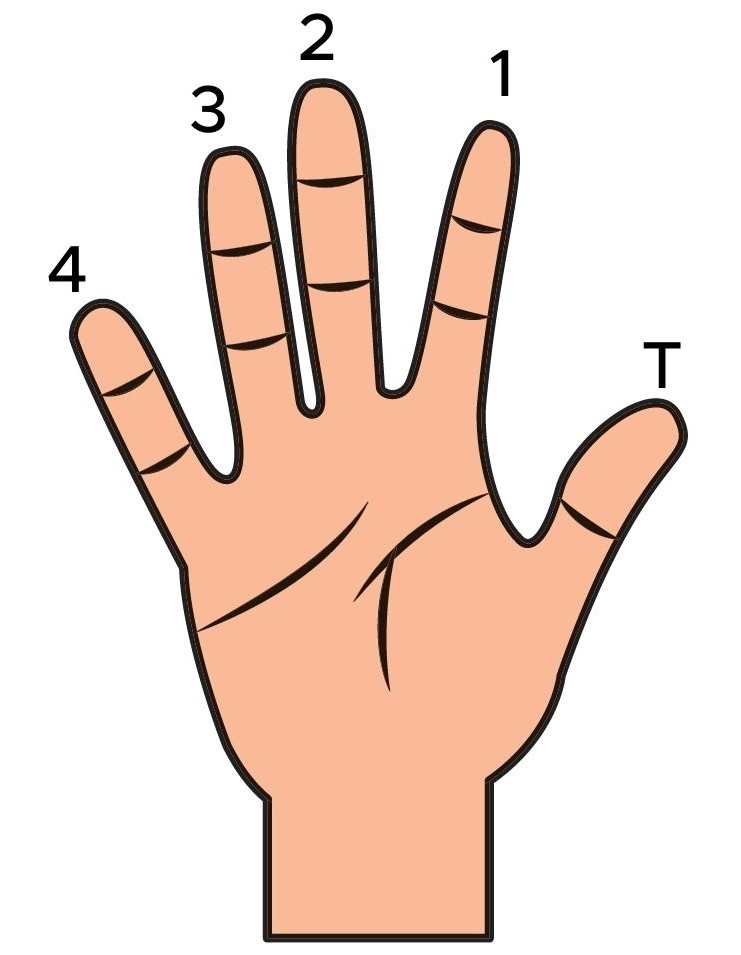
The numbering below a chord chart indicates the fingers you should use on the particular string. This works as an instruction for your fretting hand.
It demonstrated the fingers with numbers, such as: 1 - Index Finger 2 - Middle Finger 3 - Ring Finger 4 - Little Finger You may think, what about the thumb? Well, the thumb is generally used for holding the guitar neck properly.
![All the Parts of Guitar Explained [With Diagram]](https://enthu.com/blog/media/ZPh6ReASD2ezfDmB.jpg)
However, you may find the 'T' symbol in some advanced chord diagrams instead of a number. In that case, you have to use your thumb to fret that individual note.
Here's an example of a famous thumb chord

4. What are the Black Dots?
The back dots on a chord diagram is an indication mark of the frets to be used. It tells you which particular string and fret you need to press down.

This is the same with numbers and the black dots. According to the chord chart, you need to place your 1st (index) finger on the 2nd fret of the 3rd (D) string, 2nd (middle) finger on the 2nd fret of the 1st (high E) string, and finally hold the 3rd fret of the 2nd (B) string with your 3rd (ring) finger.
5. What are the 'X' and 'O's?

'O's and 'X's on the top of the chart, specifically over the nut. The 'X' symbols stand for unused strings.

As you can see in the above image, the 5th (A) and 6th (low E) strings are marked with 'X.' It means that these particular strings are not used to play the D major chord formation. Similarly, the 'O' symbol represents an open string.
You might be thinking, what is an open string? Well, an open string is when you play a particular string without pressing any fingers on the fret. Look at the above image. The 4th string is marked with an 'O' symbol.
It means you have to strum it without pressing down any fret. If you look closely, you won't find any black dots (identification marks for frets) on strings marked with the 'O' symbol.
How does a Barre Chord Chart Look Like?
Although barre chords are for advanced guitarists, it doesn't hurt to know how to read a barre chord from the chord chart.

The straight horizontal black line on the chord diagram instructs you to use the barre technique to play this chord. Usually, the first finger (index finger) is used to hold the barred fret. However, you can use a capo for the same finger position.

1. What Happens
When the Chords are Above the 5th fret? As I have mentioned before, chord charts usually represent the first five chords. So, what if a chord formation goes beyond the 5th fret?

The above diagram will give you a satisfactory explanation. There is a '6fr' symbol on the starting fret. It means that you have to consider the chord diagram starting from the 6th fret.
Sometimes, it is just written as '6' or 'VI' to notify that the chord starts from the 6th fret. Here are some examples of chords ranging beyond the 5th fret.

2. How do you read guitar chord charts?
Let's read a few guitar chord diagrams together to make it crystal clear.

This is called A major, one of the easiest chords to play on guitar. As you can see on the chart, the 'X' symbol over the 6th (low E) string means that the particular string will remain unused here.
On the contrary, the 'O' symbol over the 5th (A) and 1st (high E) strings indicate that these two chords will remain open while playing. Now, the black dots are placed on the 2nd fret of the 4th, 3rd, and 2nd strings. So, place your 1st finger (index finger) on the 2nd fret of the 4th string.
Now place the 2nd finger (middle finger) on the 2nd fret of the 3rd (G) string. Lastly, put your 3rd finger (ring finger) on the 2nd fret of the 2nd (B) string.
Once you have placed your fingers according to the chord chart, strum the chord downward from the 5th string. Let's try another one; we will pick a complex chord this time.
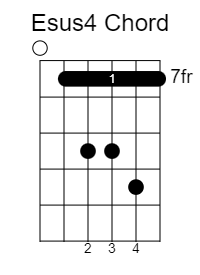
The first thing you notice is the '7fr' symbol on the right side of the first fret of the diagram. It means this chord starts from the 7th fret. Next, the 'O' symbol over the 6th string (low E) indicates that this string will remain open.
Now, you have to barre the first 5 strings (high-E string - A string) on the 7th fret with your 1st finger. You might think, how do you know whether you should use a barre with your first finger or not? Well, the barring technique is mostly performed with the index finger on the guitar.
According to the picture, start by placing your 2nd finger on the 9th fret of the 4th string (D string). Now, hold the 9th fret of the 3rd string (G string) with your 3rd finger (ring finger).
Finally, place the 4th finger (pinky finger) on the 10th fret of the 2nd string. Once you get the finger positions right, strum all the strings downward to play the Esus4 chord properly.
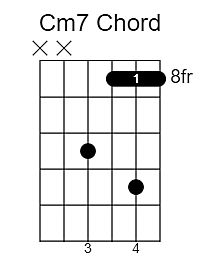
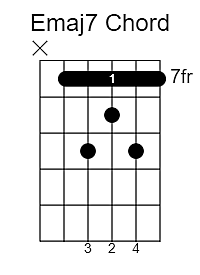
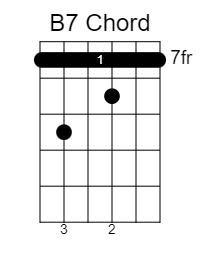
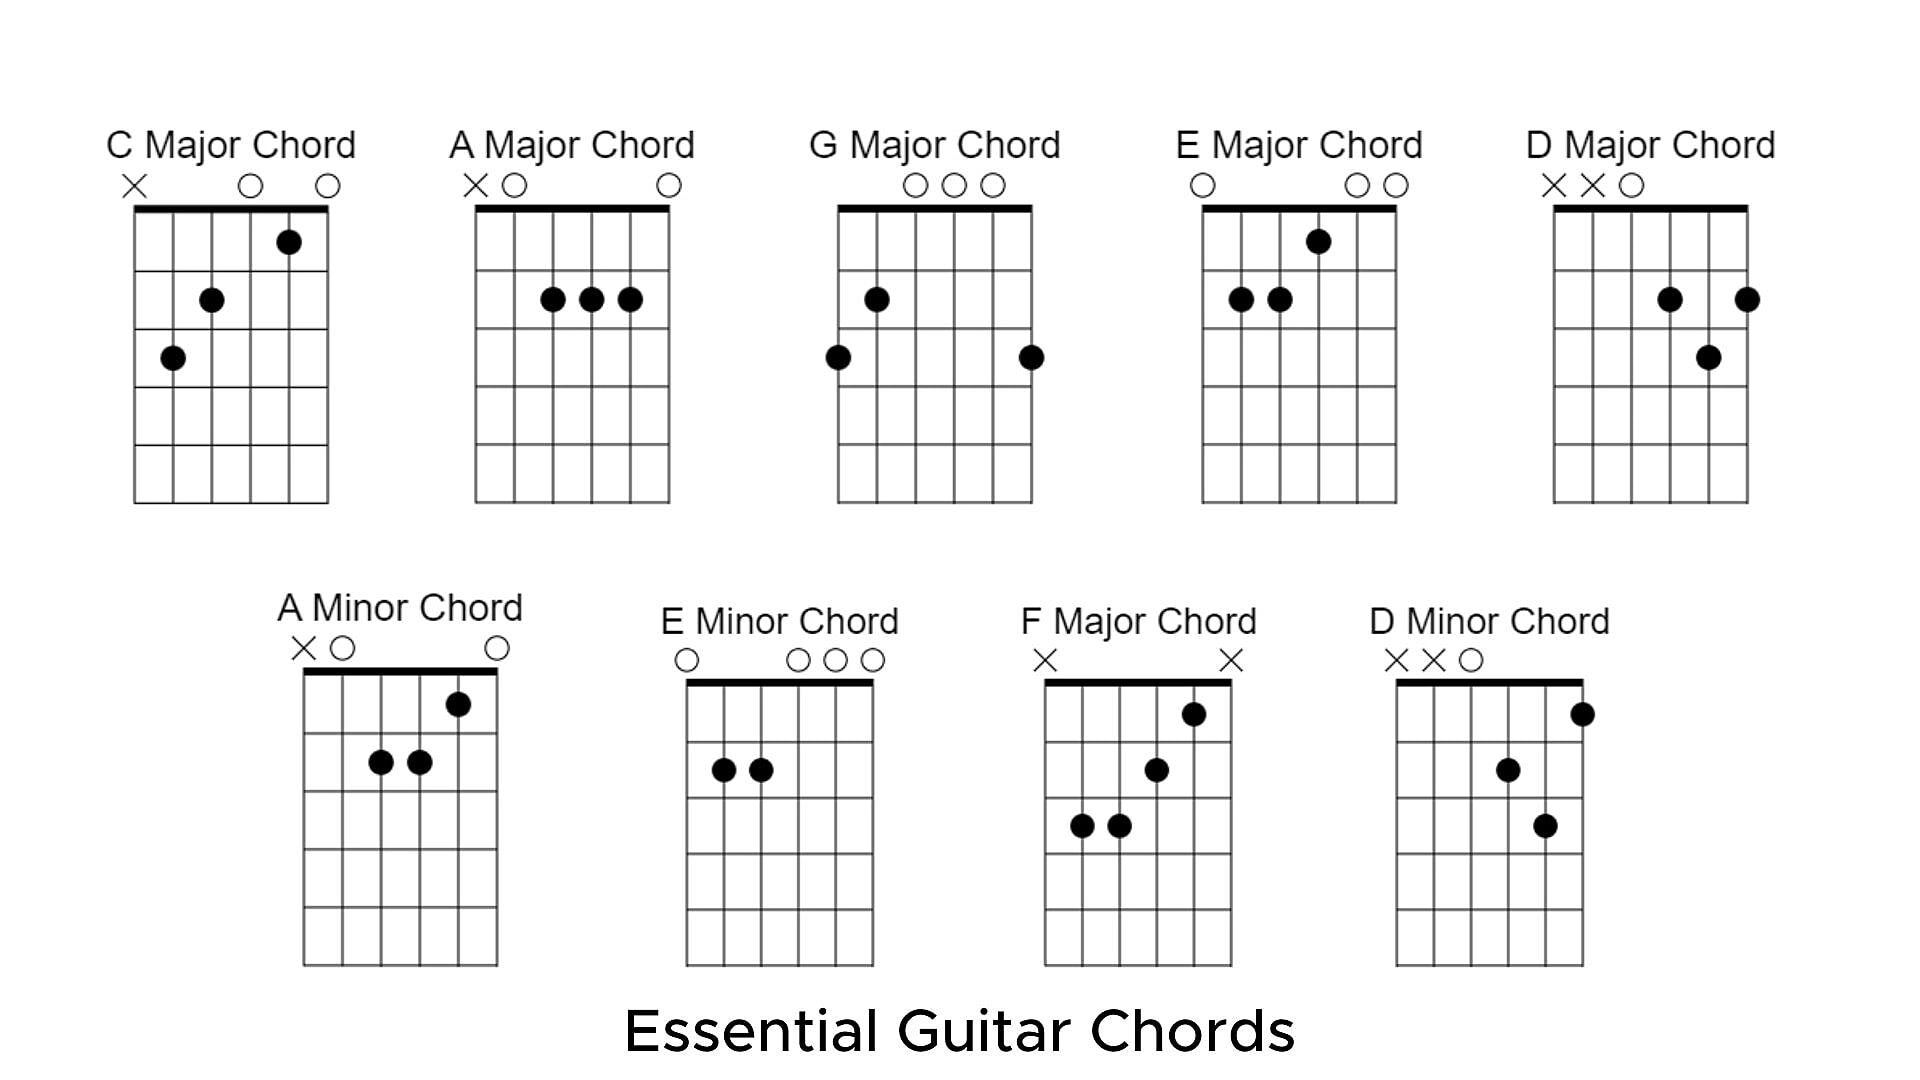
3. Essential chords
To start with Step up your chord-playing games with these essential yet easy chords.
Quick Summary of the Guitar Chord Charts
The top horizontal line (thick black line) is the nut on the guitar fretboard.
'O' symbol represents open strings.
'X' symbols represent unused strings.
Black dots are the representation of finger placements.
The 'T' sign means you have to play the string with your thumb.
The numbering under a diagram represent the fingers you should use on the particular string.
The strings on a guitar chord diagram are (from left to right): low E (thickest string), A, D, G, B, and high E(thinnest string).
If a chord goes beyond the 5th fret, it is mentioned on the right side of the chord chart.

Conclusion
Once you understand the formation of a guitar chord chart, it becomes effortless. Now that you have learned how to read guitar chord charts don't waste your time and start practicing the chords. Do you aim big? If so, join EnthuZiastic guitar classes for comprehensive customized guitar courses. Last but not least, don't lose hope, as your idols were also beginners once. So, be patient, believe in yourself, and learn to play the guitar by heart. Best wishes for your musical journey ahead!

FAQs
1. What are the benefits of reading guitar chord charts?
Guitar chord charts are the easiest way to remember and practice guitar chords. If you can picture them in your head, you can play any chord anytime. The best thing is that you can use guitar chord charts even while playing a song. These are easy to follow and chord charts make fingering easily.

2. How do you master guitar chords?
Start playing the basic chords one by one slowly. Once you can remember them, start playing them in a rhythm. It is best to practice guitar chords by playing simple songs with chords. It will improve your overall chord progression skills and help you remember the chords easily.
3. Should guitar players use guitar tabs?
Yes, guitar players should use guitar tabs. However, tabs can be challenging for beginners to follow. Most professional guitarists use guitar tabs because they make it easier to follow every notation.


Comments