

Online instrument class setup is the secret sauce behind every successful virtual piano, keyboard, or tabla lesson.
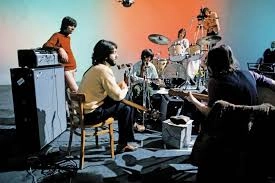
Welcome to the definitive guide on setting up your online instruments class, whether you’re teaching piano, keyboard, tabla, or any other musical marvel. The surge in remote learning isn’t just a pandemic relic; it’s a full-blown cultural shift. From Billie Eilish’s bedroom beats to the global Zoom jam sessions, the way we learn and teach music has changed forever.
- Why online instrument class setup matters
- Choosing your gear: The essentials for online instrument class setup
- Audio: The secret ingredient of online instrument class setup
- Visuals: Make your online instrument class setup pop
- Online instrument class setup: Platform power moves
- Pop culture meets practice: Keeping students engaged
- Online instrument class setup for specific instruments
- Troubleshooting your online instrument class setup
- Future-proofing: Where online instrument class setups are headed
- Conclusion: Your online instrument class setup, supercharged
- FAQs
But let’s be honest: teaching music online is not just about switching on your webcam and hoping for the best. The difference between a class that feels like a grainy, laggy video call and one that’s a dynamic, immersive, and inspiring experience? It’s all in the setup.
This blog will walk you through every step: tech choices, Zoom settings, camera angles, sound hacks, and even a few pop culture references to keep things spicy.
Why online instrument class setup matters
Online instrument class setups are the backbone of effective digital music education. Think of them as the difference between a TikTok video shot on a potato and a cinematic masterpiece: same content, wildly different impact. A smart setup ensures:
Students see and hear you clearly (no more “Can you play that again?”).
You can demonstrate techniques with precision.
The vibe is professional, not accidental YouTuber.
Plus, a killer setup boosts your confidence and lets your teaching personality shine, whether you’re channeling your inner Ted Lasso or channeling Mozart.
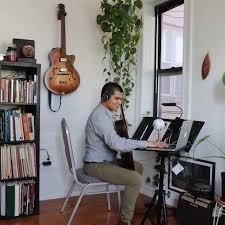
Choosing your gear: The essentials for online instrument class setup
Device Selection
The good news: You don’t need a NASA control room to run a great online instruments class. Your smartphone, laptop, or tablet is usually enough to get started. But for the best experience, use the largest screen available: laptops and tablets let you see your students’ hands and faces more clearly, which is crucial for instruments like the piano and tabla.
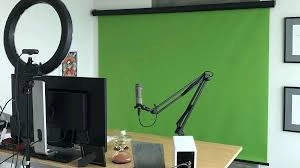
Camera Angles & Mounts
Main Camera: Position your device so students can see your hands and instrument clearly. For piano and keyboard, an overhead shot is gold. Use a mic stand, boom arm, or even a stack of books to get the right angle.
Tripods & Goosenecks: Want to level up? A phone tripod or gooseneck holder can give you pro-level flexibility for the perfect shot.
Tablet Stands: If you’re using a tablet, a dedicated stand keeps things stable and hands-free.

Pro Tip: Never put your device directly on the instrument; vibrations will mess with your sound quality and drive everyone nuts.
Audio: The secret ingredient of online instrument class setup
Let’s face it: bad audio kills the vibe faster than a spoiler for the season finale. Here’s how to get it right:
Microphones
Built-in mics are okay, but a USB microphone (like the Blue Yeti or Fifine K670) is a game-changer for clarity.
Always select your external mic in Zoom’s audio settings for the best sound.
Also, even the best mic can’t save a class if your Zoom settings aren’t tuned for music. That’s why every online instrument class setup needs a quick Zoom optimization session. Don’t worry—it’s not rocket science. Just follow these steps, and you’ll be streaming like a pro.
Step-by-Step Zoom Configuration for Music Classes
1. Open Zoom and Access Settings
Launch the Zoom app (preferably on a desktop or laptop).
Click the gear icon (top-right) to open “Settings.”
2. Fine-Tune Your Audio Settings
Go to the Audio tab.
Uncheck “Automatically adjust microphone volume.”
Manually set your input volume to around 60–70%.
Select your preferred microphone (external mic, if available).
3. Enable Advanced Audio Features
Click on ‘Advanced’ at the bottom of the Audio tab and make the following changes:
Set “Suppress background noise” to Low
Enable:
Show in-meeting option to enable Original Sound
High-Fidelity Music Mode
Echo Cancellation
Stereo Audio (if available)
4. Turn on “Original Sound” During Class
Once the session starts, click “Turn on Original Sound” in the top-left corner of your Zoom window. This preserves the clarity of your instrument’s tone—no more muffled tabla strokes or distorted piano chords.
Bonus Setup: Two Devices Are Better Than One
Want the cleanest communication + the best instrument view? Use two devices. Seriously, it’s a game-changer.
Device 1: Your main device for talking to students (laptop or tablet).
Device 2: A secondary device (phone or tablet) that shows your hands/instrument clearly.
Pro tips for dual device setup:
Join both devices to the same Zoom call (mute one to avoid echo).
Use a tripod, phone stand, or a good old stack of books for perfect camera angles.
Light yourself from the front or side to avoid ghostly backlight vibes.
Quick Fix Checklist: Keep It Smooth
Use wired headphones or an external mic for better sound and less echo.
Minimize background noise: Fans off, TV off, house on mute.
Do a test call with a friend or family member before your real class.
Frame the instrument properly: your students need to see those finger movements..
Visuals: Make your online instrument class setup pop
Lighting
Natural light is your friend, but avoid backlighting (unless you want to look like a witness in a true crime doc).
Ring lights or desk lamps aimed at your hands and face work wonders.
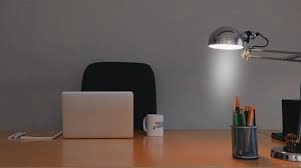
Backgrounds
Keep it uncluttered. A tidy, music-themed background (posters, plants, or your favorite vinyl) adds personality without distraction.
Multiple Angles
For advanced setups, use a second camera (even an old phone) for close-ups of your hands or tabla strokes.
Online instrument class setup: Platform power moves
Zoom
The gold standard for online music classes. Its “Original Sound” and “High-Fidelity” modes are essential for musicians.
Use the “Share Screen” feature to display sheet music, rhythm trainers, or YouTube clips.
Other Tools
Google Meet and Skype work, but lack some of Zoom’s music-specific features.
For tabla, platforms often include interactive tools like virtual metronomes and rhythm trainers; use them to supercharge practice.
Pop culture meets practice: Keeping students engaged
Let’s be real: attention spans are shorter than a TikTok loop. Spice up your online instrument class setup with these engagement hacks:
Pop Culture References: Drop in a musical meme or reference a trending show (think “Let’s play this like the Stranger Things theme!”).
Collaborative Jams: Use breakout rooms for duets or group rhythm exercises; think of it as your own virtual Glee club.
Visualizations: Many online tabla platforms offer visual stroke guides and rhythm simulations, making complex patterns easier to grasp.
Recording Features: Encourage students to record their practice sessions for feedback; instant replay, NFL-style.
Online instrument class setup for specific instruments
Piano & Keyboard
Overhead camera for hand position.
Use Zoom’s “Original Sound” and “Stereo Audio” for full-range fidelity.
Tabla
Side or overhead camera to show hand technique.
Use rhythm visualizations and interactive metronomes available on many platforms.
Encourage ensemble sessions for collaborative learning.
Other Instruments
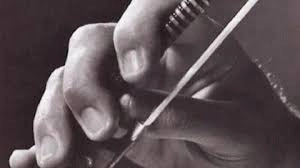
Adapt the camera angle to highlight fingerwork or bowing.
Use screen sharing for notation and backing tracks.
Troubleshooting your online instrument class setup
Laggy Video: Lower your Zoom video resolution or upgrade your internet plan.
Audio Dropouts: Use a wired connection if possible. Wi-Fi is great, but Ethernet is better.
Student Tech Issues: Create a simple tech checklist for your students (camera angle, mic selection, Zoom settings).
Future-proofing: Where online instrument class setups are headed
With AI-powered feedback, VR music rooms, and global jam sessions on the horizon, the online instrument class setup is only getting more exciting. Stay curious, keep experimenting, and remember: your setup is the stage, but your teaching is the show.
Conclusion: Your online instrument class setup, supercharged
In the golden age of remote learning, your online instrument class setup is your passport to reaching students everywhere, whether they’re in Mumbai, Manhattan, or a small town that’s never even seen a tabla. With the right tech, smart Zoom settings, and a splash of pop culture savvy, you’ll create an experience that’s as engaging as your favorite binge-worthy series.
So, set up your gear, tweak those audio settings, and get ready to teach music that moves people: one perfectly tuned, perfectly framed, and perfectly streamed note at a time.
Remember: Your online instrument class setup isn’t just about the tech. It’s about making music education accessible, inspiring, and unforgettable. Now go out there and make some noise. The world is listening.
FAQs
What is the best online instrument class setup for beginners?
The best online instruments class setup for beginners includes a reliable device (laptop or tablet), a stable internet connection, a USB microphone for clear audio, and a well-lit space. Position your camera to clearly show your hands and instrument, and use Zoom’s “Original Sound for Musicians” setting for optimal sound quality.
How do I improve audio quality in my online instruments class setup?
Use an external USB microphone instead of your device’s built-in mic. In Zoom, enable “Original Sound for Musicians,” “High-Fidelity Music Mode,” and “Stereo Audio.” Avoid background noise and keep your device off the instrument to prevent vibrations from interfering with sound.
Which platform is best for online instrument class setup: Zoom, Skype, or Google Meet?
Zoom is generally preferred for online instrument class setups due to its music-friendly audio settings like “Original Sound for Musicians” and “Stereo Audio.” Skype and Google Meet work but lack some of these specialized features.
What camera angle works best for piano, keyboard, or tabla lessons?
For piano and keyboard, an overhead or side angle showing your hands and keys is ideal. For tabla, a side or slightly overhead angle that captures both hands and the drums works best. Use a tripod or stand for stability.
How can I keep students engaged during online instrumental classes?
Incorporate pop culture references, use breakout rooms for group activities, share your screen for sheet music or rhythm trainers, and encourage students to record their practice for feedback. Visual aids and interactive tools can also boost engagement.
What are the essential tech tools for a professional online instruments class setup?
Key tools include a high-quality USB microphone, a tripod or stand for your camera, good lighting (natural or ring light), and a fast internet connection. For advanced setups, consider using multiple cameras to show different angles.
How do I troubleshoot common tech problems during online music classes?
If you experience laggy video, lower your video resolution or use a wired internet connection. For audio dropouts, check your microphone settings and minimize background apps. Always test your setup before class and have a tech checklist for students.
Can I teach group classes with my online instrument class setup?
Yes! Zoom’s breakout rooms and screen-sharing features make group classes interactive. Ensure everyone has their camera and audio set up properly, and use collaborative tools like rhythm simulators or shared sheet music.
What’s the ideal background for my online instruments class setup?
Choose a tidy, uncluttered background with some musical elements (like posters or instruments) to create a professional yet inviting atmosphere. Good lighting on your face and hands is crucial.
How do I optimize my online instruments class setup for SEO?
Use the keyword “online instruments class setup” in your meta description, slug, and early in your content. Write scannable paragraphs, use descriptive image alt text, and encourage reviews and internal links for better search visibility.
Comments