
Welcome to the Enthuziastic learning community!
At Enthuziastic – Global People to People Live Learning Network, we believe in sharing deep, valuable knowledge that helps you grow and master your favourite skills. Today, we are going to talk about a very fascinating topic in the world of chess. If you are a competitive tournament player or an enthusiastic club player, you must have faced a common problem when playing with the white pieces. That problem is the King's Indian Defense.
The King's Indian Defense is one of the most popular, aggressive, and dynamic responses by Black against 1.d4. Players in India and all over the world love it because it leads to sharp attacking games. Black allows White to build a big pawn centre, only to counter-attack it later and launch a dangerous assault on White’s king. It is a very scary opening to face if you are not fully prepared.
So, how do you stop this aggressive plan? How do you play proper chess and take the sting out of Black's attack? The answer lies in mastering a brilliant chess opening strategy known as the Averbakh system. This system is designed to frustrate King's Indian players, stop their typical plans, and give White a solid, positional advantage. Let us take a deep dive into how to play Averbakh system effectively, understand its strategic ideas, and learn how to secure more wins in your tournament games.
Introduction to the Averbakh system
When you are trying to improve your chess opening strategy, understanding the initial moves and why they are played is very important. The Averbakh system is a specific setup for White that targets the core ideas of the King's Indian Defense. Instead of playing the most common main lines where Black gets exactly what they want, White chooses a more restrictive and controlling path.
What the Averbakh system is and how it arises
Every chess opening has a specific sequence of moves, and the Averbakh system is no different. Let us look at the exact move order that leads to this interesting position on the board.
The game begins with the classical central advance 1.d4. Black replies with 1...Nf6, stopping White from immediately playing e4. White continues with 2.c4, grabbing more space and controlling the central d5 square. Black plays 2...g6, preparing to fianchetto their dark-squared bishop, which is the hallmark of the King's Indian Defense.
White plays 3.Nc3, bringing out a piece and again preparing the e4 push. Black completes the fianchetto setup with 3...Bg7. Now, White takes full control of the centre with 4.e4. Black plays 4...d6, a crucial move that stops White from pushing e5 and prepares for their own central breaks, usually ...e5 or ...c5.
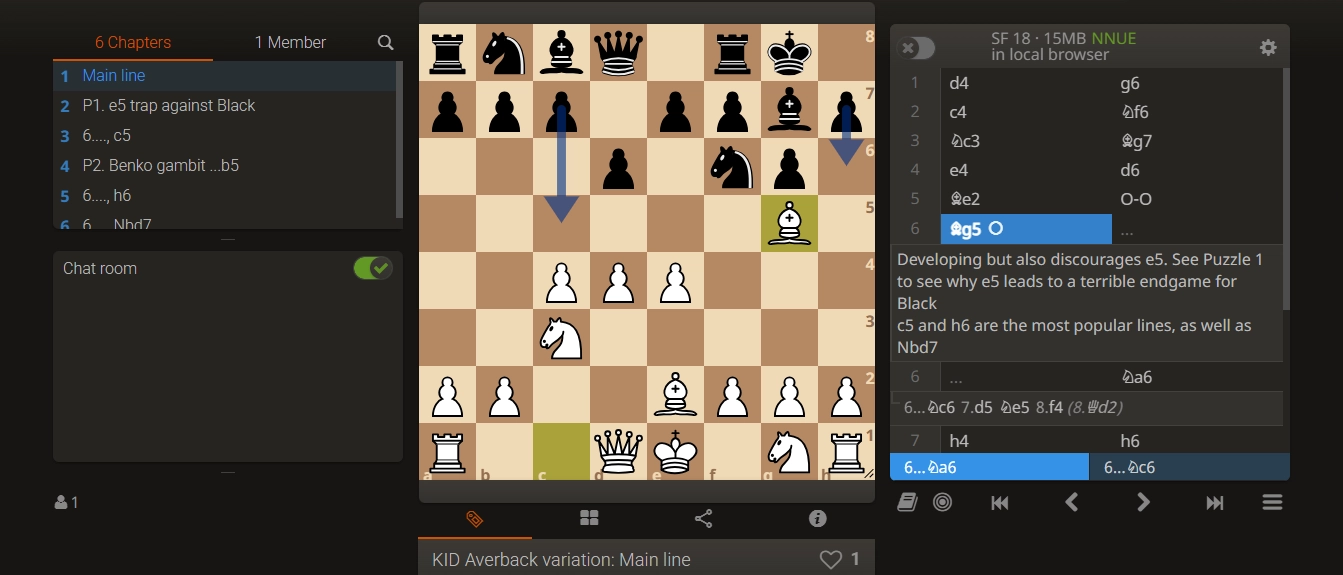
Here, White plays a very solid and flexible developing move: 5.Be2. This prepares kingside castling and gets ready for the defining move of the system. Black naturally plays 5...O-O to secure their king. And now comes the star move of our topic today: 6.Bg5.
This move, 6.Bg5, is what signals the start of the Averbakh system. By developing the bishop to this active square early on, White immediately creates new problems for Black and changes the entire nature of the game.
Why this system is a powerful weapon for white
You might be wondering why placing the bishop on g5 is such a powerful weapon. The strength of the Averbakh system lies in its psychology and its positional restriction. When a player chooses the King's Indian Defense, they usually have a very specific dream. They dream of blocking the centre, playing ...e5, moving their f6 knight away, and then launching a pawn storm on the kingside with ...f5, ...f4, and ...g5.
The move 6.Bg5 acts like a giant roadblock to this dream. By placing the bishop there, White puts immediate pressure on the f6 knight. More importantly, it makes the typical ...e5 pawn break very difficult and sometimes even unfavourable for Black. If Black plays ...e5 too quickly, White can capture it, leading to a queen exchange and an endgame where Black's kingside attack is completely gone, and White has a very pleasant positional edge.
Furthermore, this system leads to positions where White maintains a spatial advantage and dictates the flow of the game. It forces King's Indian players out of their comfort zone. They can no longer play on autopilot. They have to think independently from move six, which often leads to mistakes. This makes the Averbakh system an excellent practical choice for tournament play.
Brief history of the system and grandmaster Yuri Averbakh
To truly appreciate a chess opening strategy, it helps to know a little bit about the history behind it. The Averbakh system is named after the legendary Soviet Grandmaster Yuri Averbakh. Grandmaster Averbakh was not just an incredibly strong player; he was also a highly respected chess theoretician, an author, and one of the greatest endgame experts in the history of the game. He lived to be 100 years old, dedicating his entire life to the beautiful game of chess.
Yuri Averbakh’s playing style was deeply positional, logical, and structurally sound. He did not like allowing unnecessary chaos on the board. In the 1950s, the King's Indian Defense was gaining massive popularity. Players like David Bronstein and Isaac Boleslavsky were using it to crush their opponents with brilliant attacks. Averbakh wanted a way to play against it that relied on solid positional principles rather than getting dragged into wild, unpredictable tactical brawls.
He popularised the 6.Bg5 variation because it perfectly suited his logical approach. It allowed White to clamp down on the centre, restrict the opponent's active counterplay, and steer the game into waters where better understanding of pawn structures and piece coordination would win the day. Today, modern grandmasters still use his system to frustrate aggressive opponents.
Key strategic ideas behind the Averbakh system
If you want to know how to play Averbakh system properly, memorising moves is never enough. You must understand the underlying strategic concepts. The Averbakh is a system based on restriction, central control, and exploiting small positional advantages. Let us break down these key ideas so you can apply them in your own games.
How early bg5 puts pressure on black’s knight
The most obvious feature of the Averbakh system is the dark-squared bishop aggressively posted on g5. But what is it actually doing there? First of all, it creates a very annoying pin, or at least the threat of a pin, on the knight at f6. In many variations of the King's Indian Defense, Black desperately needs to move this f6 knight to squares like d7, e8, or h5 so they can push their f-pawn forward.
Because the bishop on g5 is watching that knight closely, moving it can become very problematic. If the knight moves, the bishop might capture a piece behind it, or it might just restrict where the knight can safely go.
More importantly, the presence of the bishop on g5 strongly discourages Black from playing their standard ...e5 break. If Black tries to force ...e5, White is perfectly positioned to handle it. White can simply play dxe5. After Black plays dxe5, White can trade queens with Qxd8. After the black rook recaptures with Rxd8, White often follows up with Nd5. Suddenly, Black's position is very uncomfortable. Their pawn structure is solid, but White's pieces are much more active, and the threat of winning material is very real. By just making one developing move, White has disrupted Black's entire opening preparation.
The importance of controlling central squares
Chess is ultimately a game about controlling the centre of the board. The squares d4, e4, d5, and e5 are the high ground of the chess battlefield. The Averbakh system excels at claiming and holding this high ground. By placing pawns on c4, d4, and e4, White establishes a massive, imposing pawn centre.
This central control is the foundation of White's advantage. Because White has more space in the centre, White's pieces have more room to manoeuvre. They can easily swing from the queenside to the kingside if needed. On the other hand, Black's pieces are somewhat cramped behind their own pawns.
The Averbakh system teaches us a very valuable lesson in chess strategy: maintaining central tension. White does not rush to push the pawns further unless there is a clear benefit. Instead, White holds the centre firmly, waiting for Black to make a concession. By doing so, White prevents Black from executing their typical pawn breaks comfortably. This patient, controlling approach is what makes the Averbakh so hard to crack.
Typical strategic goals for white
When you are playing the White pieces in this system, you need to have clear, long-term goals in your mind. Without a plan, you will simply drift and eventually fall victim to a tactical trick.
Your first major strategic goal is to secure a lasting space advantage. Because Black will find it hard to play ...e5, they will often be forced to play ...c5 instead. This transforms the pawn structure into something resembling a Benoni defense. If this happens, White's goal is to keep an iron grip on the d5 square. You want to make sure Black cannot easily liberate their position.
Another key goal is to slowly prepare your own pawn breaks while suppressing Black's. If the centre becomes closed, White will usually look to expand on the queenside. Moves like a3, b4, and c5 will be part of your plan to break through Black's defenses. Meanwhile, your solid setup with Be2 and Bg5 will keep the kingside secure, ensuring that Black's typical attacking ideas simply bounce off a brick wall. The overall strategy is to slowly squeeze your opponent, improving your position step by step until they crack under the pressure.
Main plans and structures for white
Understanding the pawn structures that arise from the opening is the secret to playing good chess. The pawn structure tells you where to put your pieces and where to attack. In the Averbakh system, the plans are deeply connected to how Black chooses to fight back against your central control.

How white should develop pieces efficiently
Proper piece development is the key to maintaining the pressure in the Averbakh system. After you have established your pawn centre and played Be2 and Bg5, you need to bring the rest of your army into the game efficiently.
One of the big questions for White is where to develop the kingside knight. Unlike many other openings where the knight always goes to f3, the Averbakh system gives you flexibility. Sometimes, the knight goes to f3 to support the centre traditionally. However, very often, White prefers to play Qd2 first, preparing to castle queenside or just supporting the bishop on g5. In these cases, the knight might actually develop to e2. Developing the knight to e2 keeps the f-pawn free to move, which can be useful for defending the e4 pawn or launching an attack later.
Your queen usually finds a great home on d2. From d2, it connects the rooks, supports the g5 bishop, and keeps an eye on the queenside. As for your king, you have the flexibility to castle kingside (O-O) if the position remains semi-open, or castle queenside (O-O-O) if the centre gets locked up and you want to launch a massive pawn storm against Black's king. This flexibility is a huge headache for your opponent.
Typical responses black may choose and how to meet them
Because the normal ...e5 plan is restricted, Black players have to try different, sometimes unnatural setups to fight back. Let us discuss the most common responses you will face and how to handle them calmly.
First, Black might try to play ...h6 to immediately question your bishop on g5. This is a very critical moment. You usually have two good choices: retreat the bishop to e3 or retreat it to h4. If you drop it back to e3, you keep an eye on the centre and prepare Qd2. If you drop it back to h4, you maintain the pin on the f6 knight and keep the tension high. Both are excellent choices depending on your personal style.
Secondly, Black often plays ...c5 to challenge your d4 pawn. This is their way of fighting for central control. When Black plays ...c5, the best reaction is almost always to push past with d5. This closes the centre and creates a Benoni-style pawn structure. However, because you have not committed your knight to f3 early on, you are in a much better version of the Benoni than usual. You can play solidly, maneuver your knights to excellent outposts, and slowly prepare a queenside breakthrough.
Thirdly, you will very often see Black play ...Na6. The idea behind this funny-looking knight move is to prepare ...c5 without blocking the c-pawn, or to jump into c5 later if the centre opens up. When you see ...Na6, you should simply continue your flexible development, perhaps playing Qd2 and preparing to meet their central break with a strong, solid response. Keep your structure intact and do not panic.
Typical middlegame ideas from different pawn structures
The transition into the middlegame in the Averbakh system is all about understanding the pawn formations. If the centre becomes completely locked (White pawns on c4, d5, e4 vs Black pawns on c5, d6, e5), the game becomes highly strategic. In this locked structure, your plan is strictly on the queenside. You will prepare the b4 pawn break to open lines for your rooks on the queenside, while making sure your kingside is locked down tightly against any desperate attacks.
Sometimes, the position resembles a Maróczy Bind setup. This happens if Black trades pawns with ...cxd4 and White recaptures. In a Maróczy Bind structure, White has pawns on c4 and e4, creating a clamp on the d5 square. Here, your middlegame idea is pure positional domination. You restrict Black from making any freeing pawn breaks, place your pieces on active squares, and slowly squeeze them off the board. You win by giving Black no active plans, forcing them into passivity until they make a fatal structural error.
Practical game plans and typical tactics
Chess is a practical game. Even with the best strategic understanding, you have to make concrete decisions at the board. Let us look at some specific, practical game plans and the tactical motifs you need to be aware of when playing this system.
Handling the ...h6 break from black
When Black plays ...h6, they are asking your bishop a direct question. Your decision here shapes the rest of the game. Let us look at this practically.
Suppose you choose to play Bxf6. This is a very committal decision. By giving up the bishop pair, you are handing Black a long-term advantage in open positions. However, in return, you get immense central control. After Black recaptures with ...Bxf6, their dark-squared bishop has moved away from defending their king. You can follow up with Qd2, build a massive centre, and aim for a quick, crushing attack if Black is not careful. This approach requires very precise, energetic play.
On the other hand, the more common and solid approach is to retreat the bishop to e3. The bishop on e3 is a fantastic piece. It overprotects the d4 pawn, supports a future f4 push if needed, and gets ready for Qd2. It tells Black, "You wasted a tempo playing ...h6, and I am simply going to continue my solid development." If you play Be3, you are aiming for a long, strategic battle where your superior pawn structure will eventually decide the game.
What to do when black plays ...Na6 or prepares ...c5
Black's ...Na6 is a very tricky move that you will see often in local tournaments. The knight looks misplaced on the edge of the board, but it is actually preparing to support a ...c5 break.
Your practical plan against ...Na6 is to not get distracted. Continue your central consolidation. Play Qd2, maybe get your king to safety, and wait for them to push ...c5. When they finally play ...c5, you push d5. Now, their knight on a6 suddenly looks very silly. It has no good squares to jump to. It will take them several moves to reroute that knight to a useful square like c7 or e8. During that time, you have the initiative. You can start expanding on the queenside or improving the positions of your own knights.
If Black prepares pawn breaks very slowly, you should take the opportunity to grab even more space. Do not be afraid to push a3 and b4 if the position allows it, completely shutting down their queenside counterplay before it even begins.
Common tactical motifs and leveraging central tension
While the Averbakh is a positional system, tactics are always hiding just beneath the surface. You must stay alert. One of the most common tactical motifs revolves around exploiting the pin, or the shadow of the pin, on the f6 knight. If Black carelessly moves their queen away from the d8-h4 diagonal, you might find sudden tactical shots involving e5 pawn pushes, attacking the pinned knight.
Another typical tactic involves central breakthroughs. Because you have massive tension in the centre with pawns on e4 and d4, if Black makes a loose move, you might suddenly have the opportunity to push d5 or e5 with devastating effect. Always calculate what happens if you break the centre open. If Black's pieces are awkwardly placed, opening the centre will almost always favour you.
You also need to watch out for Black's tactical tricks. They will often try to sacrifice a pawn on the queenside just to open a file for their rook, or try to trick you into a knight fork if you leave your pieces undefended. By maintaining a solid structure and keeping your pieces protected, you nullify 90% of their tactical ideas.
Transitioning to the middlegame
The opening phase is only the beginning. The real battle happens in the middlegame. To master your chess repertoire, you need to know exactly how to handle the positions that arise after the opening moves have been played.

Why understanding middlegame patterns is critical
In systems like the Averbakh, memorising move sequences is not enough to win. Your opponent will inevitably deviate from the book lines. When that happens, you need to rely on your understanding of middlegame patterns.
You need to recognise when the position demands a queenside attack versus a central breakthrough. You must be familiar with the typical knight manoeuvres, such as transferring your knight from c3 to e2, then to g3, and finally to f5 to create attacking chances. Understanding these patterns allows you to find the best moves quickly without burning all your time on the clock. It gives you a roadmap to navigate the complex middlegame confidently.
How white can convert a positional advantage
Converting a small positional advantage into a full point is one of the hardest skills in chess. In the Averbakh system, your advantage usually consists of more space and better piece coordination. To convert this, you must apply the principle of two weaknesses.
If you are attacking on the queenside and Black defends perfectly, you must slowly create a second weakness on the other side of the board. You stretch their defenses until they break. Do not rush. Make improving moves. Bring your rooks to the open files. Improve your king position. In space advantage situations, patience is your best friend. Wait for Black to run out of useful moves and make a structural compromise, and then strike hard.
How to avoid common pitfalls and remain flexible
Even the best systems have pitfalls. The most common mistake White players make in the Averbakh system is becoming too greedy or overextending their pawns. If you push your pawns too far forward without enough piece support, they will become weak, and Black will happily chop them down.
Another major pitfall is falling asleep on the kingside. Just because you have prevented their immediate ...e5 break does not mean Black will stop trying to attack you. You must always keep one eye on your king's safety. Do not leave your kingside completely devoid of defenders.
Remain flexible in your thinking. If Black chooses an unusual setup, do not stubbornly stick to your pre-planned ideas. Adapt to the situation on the board. If the centre unexpectedly opens up, be ready to play actively with your pieces rather than relying strictly on slow pawn pushes.
Training methods and improvement tips
If you are serious about incorporating this system into your play, you need a structured study plan. Reading an article is a great first step, but real improvement comes from dedicated practice and deep analysis.

Practising through annotated games and analysis
The best way to learn how to play Averbakh system is to study games played by strong grandmasters. Do not just look at the raw moves; you must study annotated games. Annotated games contain notes and explanations written by stronger players, detailing the thoughts and plans behind the moves.
When you study an annotated game, use a physical chessboard. Play through the moves slowly. At critical moments, pause and try to guess the next move before looking at the text. This active learning approach will force your brain to engage with the strategic concepts deeply. After you play your own tournament games with the Averbakh, make sure to analyse them with a chess engine. The engine will point out tactical errors, but you must figure out the strategic mistakes on your own by comparing your play to master games.
Importance of studying model games
Model games are specific master games that perfectly demonstrate the core ideas of an opening. You should collect a small database of 10 to 15 model games for the Averbakh system. Look for classic games by Yuri Averbakh himself, as well as modern games by players like Vladimir Kramnik or Levon Aronian, who have used similar setups successfully.
Review these model games frequently. Memorise the key manoeuvres, the typical pawn breakthroughs, and how the masters handled the transition into the endgame. Having these model games deeply embedded in your memory will act as a guiding light when you are confused during your own matches.
Incorporating the averbakh system into your broader repertoire
Building a proper chess repertoire is a journey that takes a lot of time and dedication. When you are sitting at the board, you need different types of weapons to surprise your opponents and stay comfortable in various situations. For example, when you are playing as Black against 1.e4, you might have done your opening preparation on sharp, theoretical lines like the Classical Sicilian. Or, when playing White, you might enjoy launching aggressive, tactical attacks with the Sozin attack. These dynamic choices are fantastic for creating complications and playing for a win in chaotic positions.
However, your complete repertoire also needs balance. When you open with 1.d4, having a solid, positional squeezing tool like the Averbakh system gives you a well-rounded profile. It shows your opponents that you are not just a one-dimensional tactical attacker, but also a strategic grinder who understands deep positional concepts. This perfect balance between sharp, fighting lines like the Sicilian and solid, controlling setups like the Averbakh will make you a very unpredictable and tough player to face in local Indian tournaments and online matches. It gives you the flexibility to choose the right weapon depending on your opponent's style and your own tournament situation.
Frequently asked questions (FAQs)
1. Is the Averbakh system suitable for beginner chess players? Yes, it can be very suitable! While the deep strategy takes time to master, the basic opening preparation is quite logical. It teaches beginners the importance of central control and developing pieces solidly without falling for cheap early traps.
2. What happens if Black completely ignores the Bg5 pin? If Black ignores the pin and plays carelessly, White can often exploit it by creating immediate tactical threats against the pinned knight, sometimes leading to ruined pawn structures for Black or even winning material if the centre opens up suddenly.
3. Do I have to memorise a lot of deep theory to play the Averbakh? No, that is one of the best parts about this chess opening strategy. Compared to main line King's Indian systems like the Mar del Plata, the Averbakh requires far less pure memorisation. It relies heavily on understanding pawn structures and typical middlegame plans.
4. Can I play the Averbakh system against the Grunfeld Defense? The move order is very specific to the King's Indian Defense. If Black plays an early ...d5 (the defining feature of the Grunfeld), the entire structure changes, and a fast Bg5 might not be the most accurate or effective approach. You will need a different system for the Grunfeld.
5. How do I practice the middle game positions effectively? The best way is to set up typical Averbakh pawn structures on a board and play training games against a stronger friend or a chess engine. Start the game from move 10 or 15 and focus purely on executing the correct strategic plans we discussed, like queenside expansion.
6. Why don't top grandmasters play the Averbakh in every single game? At the absolute elite level, players use supercomputers to prepare very deep, specific equalising lines against almost everything. Top grandmasters rotate their openings constantly to remain unpredictable. However, it remains a dangerous surprise weapon even at the highest levels, and it is exceptionally strong at the club and national levels.
7. Should I always castle queenside in this opening? Not at all. The decision to castle kingside or queenside depends entirely on the specific position and how Black reacts. If the centre remains fluid, kingside castling is usually safer. Queenside castling is generally reserved for situations where the centre is locked and you are launching a direct pawn storm on Black's king. Flexibility is key!

Comments